Tutorial
Grafische NTP Statistiken in 29 Minuten…
|
Important
|
Dieses Kapitel wird editiert und ist noch nicht abgeschlossen. |
Voraussetzungen
Sie können eine Linux-Distribution Ihrer Wahl installieren und mit deren Paket-Management umgehen.
Sie sind sich der verantwortungsvollen Tätigkeit als root auf der Kommandozeile bewusst.
Zielstellung
1 Vorbereitung
1.1 NTP Statistiken
loopstats und/oder peerstats DateienSie sichten den Inhalt des Vezeichnisses (meist) /var/log/ntpstats und prüfen ob die Dateien dem Muster HOSTNAME.(loop|peer)stats.YYYYMMdd entsprechen.[1]
Falls nicht, benennen Sie diese um.
ntpd der aktuellen InstallationSie haben den NTP-Daemon schon zur Erzeugung von Statistiken konfiguriert.
Falls nicht, ersetzen Sie HOSTNAME in der Beispielkonfigutation und starten ntpd erneut:
mkdir -p /var/log/ntpstats
chown ntp:ntp /var/log/ntpstatsstatsdir /var/log/ntpstats/
filegen loopstats file HOSTNAME.loopstats
filegen peerstats file HOSTNAME.peerstats1.2 Linux System
Sie haben bereits Zugriff auf ein Linux-System oder Sie installieren eine Distribution Ihrer Wahl. Sie können eine physischen oder virtuellen Maschine benutzen.
Die Beispiele wurden mit drei verschiedenen Distributionen erfolgreich getestet:
| CentOS | |
| Gentoo | |
| Oracle Linux |
CentOS und Oracle Linux (OL) sind aktuelle Beispiele mit systemd als Init-System und YUM als (RPM-)Paketmanager.
Gentoo Linux benutzt in der gewählten Variante openrc und Portage.
2 ELG Stack
Sie installieren die drei Komponenten Elasticsearch, Logstash und Grafana. Zusätzlich ist Java für die beiden “Elastic-Komponenten” Voraussetzung.
-
Logstash >= 5.2.0
-
Elasticsearch >= 5.2.0
-
Grafana >= 4.1.0
2.1 Installation
Gentoo
emerge -pv elasticsearch grafana-bin jre logstash[ebuild R ~] www-apps/grafana-bin-4.1.2::gentoo 0 KiB
[ebuild R ] virtual/jre-1.8.0-r1:1.8::gentoo 0 KiB
[ebuild R ~] app-misc/elasticsearch-5.2.2::gentoo 0 KiB
[ebuild R ~] app-admin/logstash-bin-5.2.2::gentoo 0 KiBCentOS und Oracle Linux
-
Elastic: /etc/yum.repos.d/elastic.repo
-
Grafana: /etc/yum.repos.d/grafana.repo
yum list installed elasticsearch grafana java\*openjdk logstashelasticsearch.noarch 5.3.0-1 @elastic-5.x
grafana.x86_64 4.2.0-1 @grafana
java-1.8.0-openjdk.x86_64 1:1.8.0.121-0.b13.el7_3 @updates
logstash.noarch 1:5.3.0-1 @elastic-5.xyum list installed elasticsearch grafana java\*openjdk logstashelasticsearch.noarch 5.3.0-1 @elastic-5.x
grafana.x86_64 4.2.0-1 @grafana-stable
java-1.8.0-openjdk.x86_64 1:1.8.0.121-0.b13.el7_3 @ol7_latest
logstash.noarch 1:5.3.0-1 @elastic-5.xLogstash Plugins
Falls in Ihrer Logstash-Version nicht bereits enthalten, müssen Sie zwei zusätzliche Filter anonymize und translate installieren.[2][3]
logstash-plugin install logstash-filter-anonymize
logstash-plugin install logstash-filter-translatecd /opt/logstash
DEBUG=1 JARS_SKIP='true' bin/logstash-plugin install logstash-filter-anonymize
DEBUG=1 JARS_SKIP='true' bin/logstash-plugin install logstash-filter-translateSie können nun die Komponenten nacheinender konfigurieren und testen.
2.2 Logstash
Sie legen Log- und Spool-Verzeichnis an.
mkdir -p /var/opt/ntpstats-ng
mkdir /var/opt/ntpstats-ng/log
mkdir /var/opt/ntpstats-ng/spool
chgrp logstash -R /var/opt/ntpstats-ng
chmod g+w /var/opt/ntpstats-ng/log
2.2.1 Logstash Konfiguration
Sie kopieren drei Dateien in das (leere) Verzeichnis /etc/logstash/conf.d:
-
Input: 20_ntpstats-ng.conf
-
Filter: 40_ntpstats-ng.conf
-
Output: 59_ntpstats-ng.conf
Zwei weitere Dateien in das Verzeichnis /etc/logstash:
# 20_ntpstats-ng.conf
input {
    file {
        path => [
            "/var/opt/ntpstats-ng/spool/*.loopstats" (1)
            "/var/opt/ntpstats-ng/spool/*.peerstats" (2)
        ]
    }
}

# 40_ntpstats-ng.conf
filter {
    csv {} (3)
    csv {} (4)
}

# 59_ntpstats-ng.conf
output {
    file {
        path => [ "/var/opt/ntpstats-ng/log/ntpstats-ng-debug-%{+YYYY-MM-dd}.json" ] (5)
    }
}-
loopstats Spool
-
peerstats Spool
-
loopstats Filter
-
peerstats Filter
-
Output im JSON-Format
2.2.2 Logstash Test
|
Tip
|
Sie testen zuerst den Import ohne Elasticsearch und Grafana. |
systemctl start logstash.service/etc/init.d/logstash start
* Checking your configuration ...
Sending Logstash's logs to /var/log/logstash which is now configured via log4j2.properties
Configuration OK
[2017-04-10T10:23:44,131][INFO ][logstash.runner] Using config.test_and_exit mode. Config Validation Result: OK. Exiting Logstash [ ok ]
* Starting logstash ...Starten Sie nun die Beobachtung von logstash und den noch nicht existierenden Dateien.
tail -F /var/log/logstash/logstash-plain.log /var/opt/ntpstats-ng/log/ntpstats-ng-*==> /var/log/logstash/logstash-plain.log <==
[2017-04-10T10:33:19,494][INFO ][logstash.runner ] Using config.test_and_exit mode. Config Validation Result: OK. Exiting Logstash
[2017-04-10T10:33:29,706][INFO ][logstash.pipeline] Starting pipeline {"id"=>"main", "pipeline.workers"=>4, "pipeline.batch.size"=>125, "pipeline.batch.delay"=>5, "pipeline.max_inflight"=>500}
[2017-04-10T10:33:29,720][INFO ][logstash.pipeline] Pipeline main started
[2017-04-10T10:33:29,765][INFO ][logstash.agent ] Successfully started Logstash API endpoint {:port=>9600}
tail: '/var/opt/ntpstats-ng/log/ntpstats-ng-*' kann nicht zum Lesen geöffnet werden: Datei oder Verzeichnis nicht gefundenKopieren Sie nun mit Hilfe des Kommandos cat den Inhalt einer ersten Statistik-Datei ins Spool-Verzeichnis.
Ersetzen Sie die Namensmuster durch Ihre aktuellen Werte - im Beispiel localhost.
cat /var/log/ntp/stats/HOSTNAME.loopstats.YYYYMMdd >> /var/opt/ntpstats-ng/spool/HOSTNAME.loopstatscat /var/log/ntp/stats/localhost.loopstats.20160501 >> /var/opt/ntpstats-ng/spool/localhost.loopstatsIm anderen Terminal sollte Ihnen nach ein paar Sekunden von tail der Output im JSON-Format präsentiert werden.
tail -F /var/log/logstash/logstash-plain.log /var/opt/ntpstats-ng/log/ntpstats-ng-*==> /var/log/logstash/logstash-plain.log <==
[2017-04-10T11:02:25,251][INFO ][logstash.outputs.file] Opening file {:path=>"/var/opt/ntpstats-ng/log/ntpstats-ng-debug-2017-04-10.json"}
==> /var/opt/ntpstats-ng/log/ntpstats-ng-debug-2017-04-10.json <==
{"stats_host":"localhost","mjd":57509,"clock_offset":-7.76718E-4,"frequency_offset":-2.119,"type":"loopstats","stats_stamp":"2016-05-01T00:06:28.261Z","@timestamp":"2017-04-10T11:05:02.114Z","time_past_midnight":388.261,"frequency_jitter":0.002391,"es_index":"ntpstats-archive-2016-05-01","loop_time_constant":"10","rms_jitter":5.30734E-4}|
Tip
|
Sie haben die unterschiedlichen Datumsangaben bemerkt? Die Datei localhost.loopstats.20160501 wurde am 2017-04-10 importiert.Später wird es_index um Anlegen eines Elasticsearch-Index ntpstats-archive-2016-05-01 benutzt.
|
head -n 1 /var/opt/ntpstats-ng/log/ntpstats-ng-debug-2017-04-10.json | jq [4]{
"stats_host": "localhost",
"mjd": 57509,
"clock_offset": -0.000776718,
"frequency_offset": -2.119,
"type": "loopstats",
"stats_stamp": "2016-05-01T00:06:28.261Z",
"@timestamp": "2017-04-10T11:05:02.114Z",
"time_past_midnight": 388.261,
"frequency_jitter": 0.002391,
"es_index": "ntpstats-archive-2016-05-01",
"loop_time_constant": "10",
"rms_jitter": 0.000530734
}Das Feld @timestamp enthält den logstash-Zeitstempel der Verarbeitung.
Das Feld stats_stamp benötigen Sie später bei der Konfiguration der Grafana Data Source.
Es enthält den Zeitstempel der Statistikzeile der mit logstash-filter-ruby berechnet wurde.
mjd                 + time_past_midnight = stats_stamp
- - - - - - - - - - - - - - - - - - - - - - - - - - - - - - - - - - -
57509 (1)
2016-05-01T00:00:00 (2)
2016-05-01T00:00:00 + 388.261 s (3)
= 2016-05-01T00:06:28.261Z (4)-
Modifizierte Julianische Datum
-
MJD nach ISO8601
-
Addition der Sekunden nach Mitternacht
-
Ergebnis nach ISO8601
Löschen Sie Log- und Spool-Dateien und stoppen Sie logstash.
rm /var/opt/ntpstats-ng/log/*
rm /var/opt/ntpstats-ng/spool/*systemctl stop logstash.service/etc/init.d/logstash stopPassen Sie nun die Konfiguration zum späteren Output nach Elasticsearch an. Benutzen Sie die Datei 60_ntpstats-ng.conf.
rm /etc/logstash/conf.d/59_ntpstats-ng.conf
cp 60_ntpstats-ng.conf /etc/logstash/conf.d/# 60_ntpstats-ng.conf
output {
elasticsearch {
hosts => [ "localhost:9200" ] (1)
index => "%{es_index}" (2)
}
}-
lokale Elasticsearch-Node
-
Inhalt des Felds
es_index
2.3 Elasticsearch
2.3.1 Elasticsearch Konfiguration
cluster.name: ntpstats-ng

# enable cors
http.cors.enabled: true
http.cors.allow-origin: "*"
Starten Sie elasticsearch:
systemctl start elasticsearch.service/etc/init.d/elasticsearch start
* Starting elasticsearch ...
* /run/elasticsearch: correcting mode
* /var/lib/elasticsearch/_default: creating directory
* /var/lib/elasticsearch/_default: correcting ownertail -F /var/log/elasticsearch/_default/ntpstats-ng.log[2017-04-10T12:23:17,710][INFO ][o.e.n.Node ] [] initializing ...
[2017-04-10T12:23:17,957][INFO ][o.e.e.NodeEnvironment ] [n7G2It1] using [1] data paths, mounts [[/mnt/var (/dev/mapper/vg0-var)]], net usable_space [13.7gb], net total_space [15.9gb], spins? [possibly], types [reiserfs]
[2017-04-10T12:23:17,958][INFO ][o.e.e.NodeEnvironment ] [n7G2It1] heap size [1.9gb], compressed ordinary object pointers [true]
[2017-04-10T12:23:17,959][INFO ][o.e.n.Node ] node name [n7G2It1] derived from node ID [n7G2It1tSx6rh9RkBNWSMQ]; set [node.name] to override (1)
[2017-04-10T12:23:17,960][INFO ][o.e.n.Node ] version[5.2.2], pid[31603], build[f9d9b74/2017-02-24T17:26:45.835Z], OS[Linux/4.4.39-gentoo-t440p/amd64], JVM[Oracle Corporation/Java HotSpot(TM) 64-Bit Server VM/1.8.0_121/25.121-b13]
[2017-04-10T12:23:19,390][INFO ][o.e.p.PluginsService ] [n7G2It1] loaded module [aggs-matrix-stats]
[2017-04-10T12:23:19,390][INFO ][o.e.p.PluginsService ] [n7G2It1] loaded module [ingest-common]
[2017-04-10T12:23:19,391][INFO ][o.e.p.PluginsService ] [n7G2It1] loaded module [lang-expression]
[2017-04-10T12:23:19,391][INFO ][o.e.p.PluginsService ] [n7G2It1] loaded module [lang-groovy]
[2017-04-10T12:23:19,391][INFO ][o.e.p.PluginsService ] [n7G2It1] loaded module [lang-mustache]
[2017-04-10T12:23:19,391][INFO ][o.e.p.PluginsService ] [n7G2It1] loaded module [lang-painless]
[2017-04-10T12:23:19,391][INFO ][o.e.p.PluginsService ] [n7G2It1] loaded module [percolator]
[2017-04-10T12:23:19,391][INFO ][o.e.p.PluginsService ] [n7G2It1] loaded module [reindex]
[2017-04-10T12:23:19,391][INFO ][o.e.p.PluginsService ] [n7G2It1] loaded module [transport-netty3]
[2017-04-10T12:23:19,391][INFO ][o.e.p.PluginsService ] [n7G2It1] loaded module [transport-netty4]
[2017-04-10T12:23:19,392][INFO ][o.e.p.PluginsService ] [n7G2It1] no plugins loaded
[2017-04-10T12:23:21,597][INFO ][o.e.n.Node ] initialized
[2017-04-10T12:23:21,598][INFO ][o.e.n.Node ] [n7G2It1] starting ...
[2017-04-10T12:23:21,797][INFO ][o.e.t.TransportService] [n7G2It1] publish_address {127.0.0.1:9300}, bound_addresses {127.0.0.1:9300}
[2017-04-10T12:23:21,804][WARN ][o.e.b.BootstrapChecks ] [n7G2It1] max file descriptors [32000] for elasticsearch process is too low, increase to at least [65536]
[2017-04-10T12:23:24,865][INFO ][o.e.c.s.ClusterService] [n7G2It1] new_master {n7G2It1}{n7G2It1tSx6rh9RkBNWSMQ}{VrFsoVecQL-fNbcQux9Eng}{127.0.0.1}{127.0.0.1:9300}, reason: zen-disco-elected-as-master ([0] nodes joined)
[2017-04-10T12:23:24,911][INFO ][o.e.h.HttpServer ] [n7G2It1] publish_address {127.0.0.1:9200}, bound_addresses {127.0.0.1:9200}
[2017-04-10T12:23:24,911][INFO ][o.e.n.Node ] [n7G2It1] started
[2017-04-10T12:23:25,042][INFO ][o.e.g.GatewayService ] [n7G2It1] recovered [0] indices into cluster_state-
node.namein/etc/elasticsearch/elasticsearch.yml
Sie kopieren zwei Dateien in das Verzeichnis /etc/elasticsearch/config/templates:
Sie bringen die Vorlagen in die Elasticsearch-Node ein.
cd /etc/elasticsearch/config/templates

curl -XPUT 'http://localhost:9200/_template/template_node/' -d @template_node.json
{"acknowledged":true}

curl -XPUT 'http://localhost:9200/_template/template_ntpstats-ng/' -d @template_ntpstats-ng.json
{"acknowledged":true}
Für Ihre ersten Schritte konfigurieren Sie damit einen Elasticsearch-Cluster mit nur einer Node. Jeder Index wird nur aus einer Shard bestehen (keine Replicas).
template_node.json{
"template": "*",
"settings": {
"number_of_shards": 1,
"number_of_replicas": 0
}
}Beim erneuten Start von logstash - wie unter [Tutorial#_2_2_2_logstash_test] beschrieben - sehen Sie die zusätzlichen Zeilen logstash.outputs.elasticsearch.
tail -F /var/log/elasticsearch/_default/ntpstats-ng.log[2017-04-10T12:33:37,693][INFO ][logstash.runner ] Using config.test_and_exit mode. Config Validation Result: OK. Exiting Logstash
[2017-04-10T12:33:49,687][INFO ][logstash.outputs.elasticsearch] Elasticsearch pool URLs updated {:changes=>{:removed=>[], :added=>[http://localhost:9200/]}}
[2017-04-10T12:33:49,690][INFO ][logstash.outputs.elasticsearch] Running health check to see if an Elasticsearch connection is working {:healthcheck_url=>http://localhost:9200/, :path=>"/"}
[2017-04-10T12:33:50,125][WARN ][logstash.outputs.elasticsearch] Restored connection to ES instance {:url=>#<URI::HTTP:0x45383f5d URL:http://localhost:9200/>}
[2017-04-10T12:33:50,128][INFO ][logstash.outputs.elasticsearch] Using mapping template from {:path=>nil}
[2017-04-10T12:33:50,252][INFO ][logstash.outputs.elasticsearch] Attempting to install template {:manage_template=>{"template"=>"logstash-*", "version"=>50001, "settings"=>{"index.refresh_interval"=>"5s"}, "mappings"=>{"_default_"=>{"_all"=>{"enabled"=>true, "norms"=>false}, "dynamic_templates"=>[{"message_field"=>{"path_match"=>"message", "match_mapping_type"=>"string", "mapping"=>{"type"=>"text", "norms"=>false}}}, {"string_fields"=>{"match"=>"*", "match_mapping_type"=>"string", "mapping"=>{"type"=>"text", "norms"=>false, "fields"=>{"keyword"=>{"type"=>"keyword"}}}}}], "properties"=>{"@timestamp"=>{"type"=>"date", "include_in_all"=>false}, "@version"=>{"type"=>"keyword", "include_in_all"=>false}, "geoip"=>{"dynamic"=>true, "properties"=>{"ip"=>{"type"=>"ip"}, "location"=>{"type"=>"geo_point"}, "latitude"=>{"type"=>"half_float"}, "longitude"=>{"type"=>"half_float"}}}}}}}}
[2017-04-10T12:33:50,258][INFO ][logstash.outputs.elasticsearch] Installing elasticsearch template to _template/logstash
[2017-04-10T12:33:50,428][INFO ][logstash.outputs.elasticsearch] New Elasticsearch output {:class=>"LogStash::Outputs::ElasticSearch", :hosts=>[#<URI::Generic:0x5652b18f URL://localhost:9200>]}
[2017-04-10T12:33:50,464][INFO ][logstash.pipeline] Starting pipeline {"id"=>"main", "pipeline.workers"=>4, "pipeline.batch.size"=>125, "pipeline.batch.delay"=>5, "pipeline.max_inflight"=>500}
[2017-04-10T12:33:50,467][INFO ][logstash.pipeline] Pipeline main started
[2017-04-10T12:33:50,535][INFO ][logstash.agent ] Successfully started Logstash API endpoint {:port=>9600}3 Statistik-Import
Für den Import der Statistik-Dateien können Sie das Bash-Skript /opt/ntpstats-ng/bin/ntpstats-ng-transmitter verwenden.
ntpstats-ng-transmitter -s /var/log/ntpstats \ (1)
-d /var/opt/ntpstats-ng/spool \ (2)
-t loopstats (3)
-i 10 \ (4)
-v \ (5)
-n (6)|
Tip
|
Realer Import ohne Option -n.
|
ntpstats-ng-transmitter -s /var/log/ntpstats -d /var/opt/ntpstats-ng/spool -t loopstats -i 10 -vDIR_STATS = /var/log/ntpstats ; DIR_SPOOL = /var/opt/ntpstats-ng/spool ; TYPE = loopstats ; ACTION = cat ; INTERVAL = 10
cat /var/log/ntpstats/localhost.loopstats.20160501 >> /var/opt/ntpstats-ng/spool/localhost.loopstats
elapsed: 10 seconds
cat /var/log/ntpstats/localhost.loopstats.20160502 >> /var/opt/ntpstats-ng/spool/localhost.loopstats
elapsed: 10 secondstail -F /var/log/elasticsearch/_default/ntpstats-ng.log[2017-04-10T13:17:36,921][INFO ][o.e.c.m.MetaDataCreateIndexService] [n7G2It1] [ntpstats-archive-2016-05-01] creating index, cause [auto(bulk api)], templates [template_node, template_ntpstats-ng], shards [1]/[0], mappings [*]
[2017-04-10T13:17:37,581][INFO ][o.e.c.r.a.AllocationService] [n7G2It1] Cluster health status changed from [YELLOW] to [GREEN] (reason: [shards started [[ntpstats-archive-2016-05-01][0]] ...]). (1)
[2017-04-10T13:17:37,724][INFO ][o.e.c.m.MetaDataMappingService] [n7G2It1] [ntpstats-archive-2016-05-01/memWq1lzT9mXKPz8GleTdw] create_mapping [loopstats] (2)
[2017-04-10T13:17:39,198][INFO ][o.e.c.m.MetaDataCreateIndexService] [n7G2It1] [ntpstats-archive-2016-05-02] creating index, cause [auto(bulk api)], templates [template_node, template_ntpstats-ng], shards [1]/[0], mappings [*]
[2017-04-10T13:17:39,475][INFO ][o.e.c.r.a.AllocationService] [n7G2It1] Cluster health status changed from [YELLOW] to [GREEN] (reason: [shards started [[ntpstats-archive-2016-05-02][0]] ...]).
[2017-04-10T13:17:39,534][INFO ][o.e.c.m.MetaDataMappingService] [n7G2It1] [ntpstats-archive-2016-05-02/0mz9b5tBStOW9yZwVjcAQw] create_mapping [loopstats]-
Index aus
es_index, Shard austemplate_node.json -
Mapping aus
template_ntpstats-ng.json
|
Tip
|
Herzlichen Glückwunsch! |
4 Grafana
Und nun zur grafischen Darstellung…
4.1 Grafana Data Source
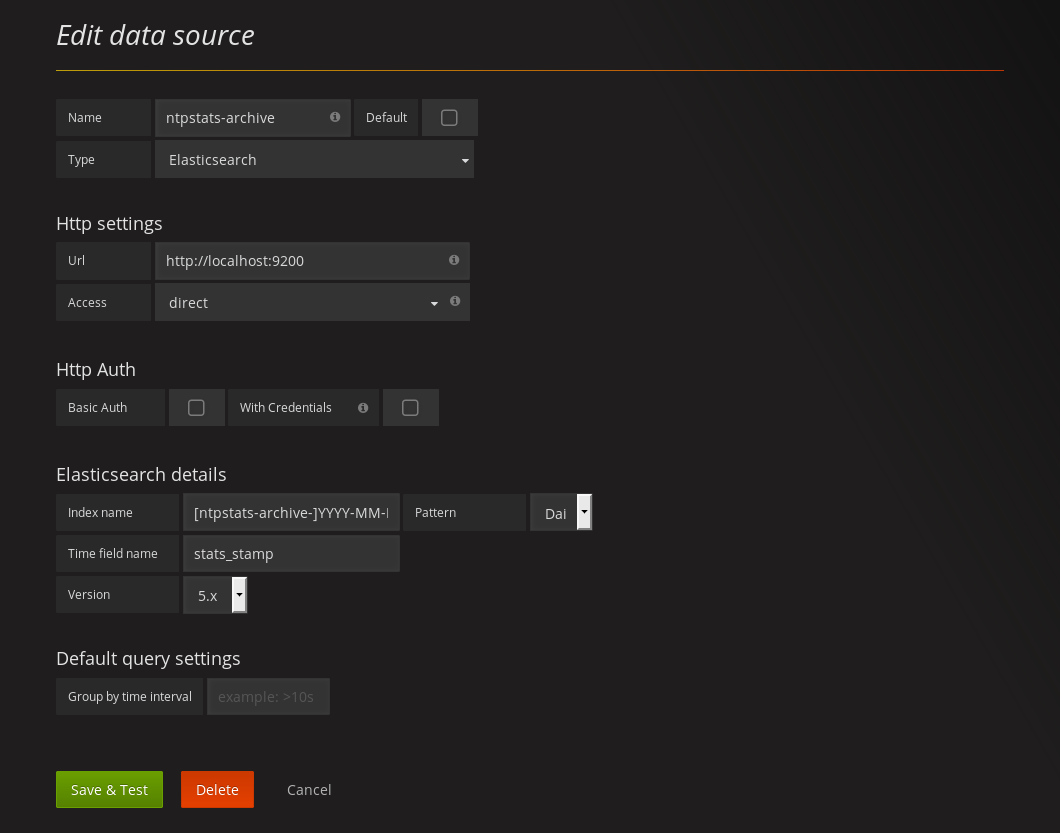
Sie legen eine neue Elasticsearch-Datenquelle ntpstats-archive an.
Name |
|
Type |
|
HTTP settings |
|
|---|---|
URL |
|
Access |
|
Elasticsearch Details |
|
Index name |
|
Pattern |
|
Time field name |
|
Version |
|
4.2 Grafana Dashboards
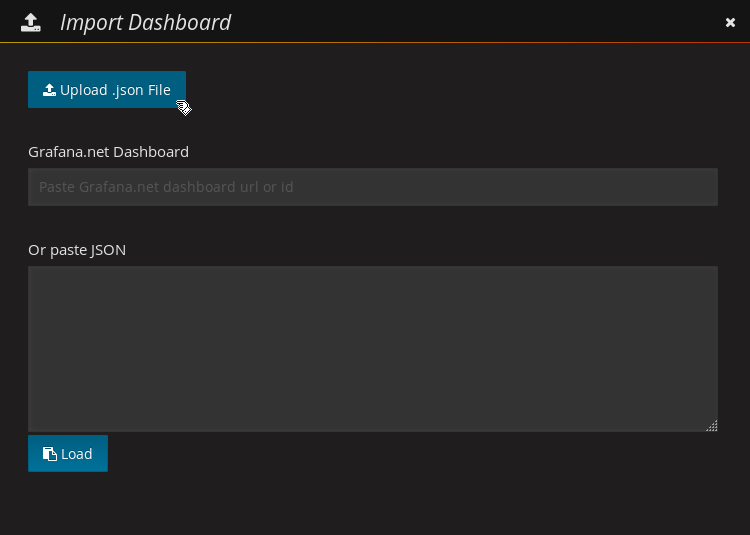
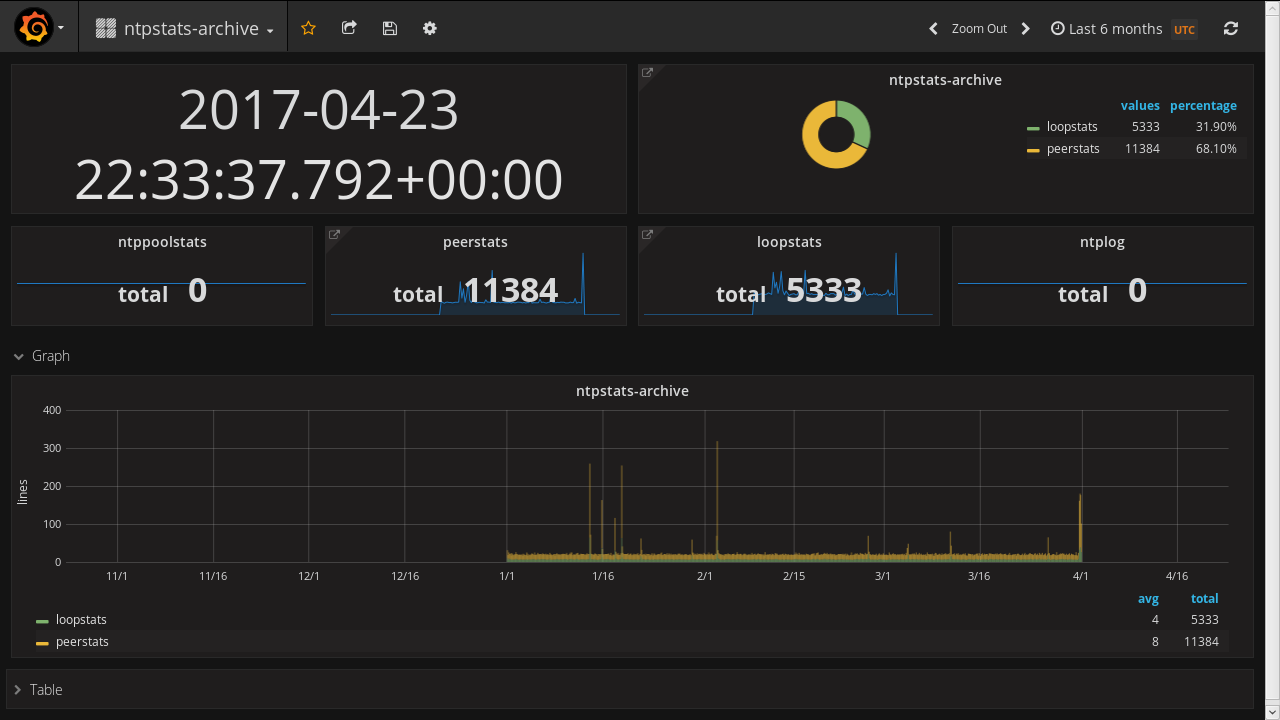
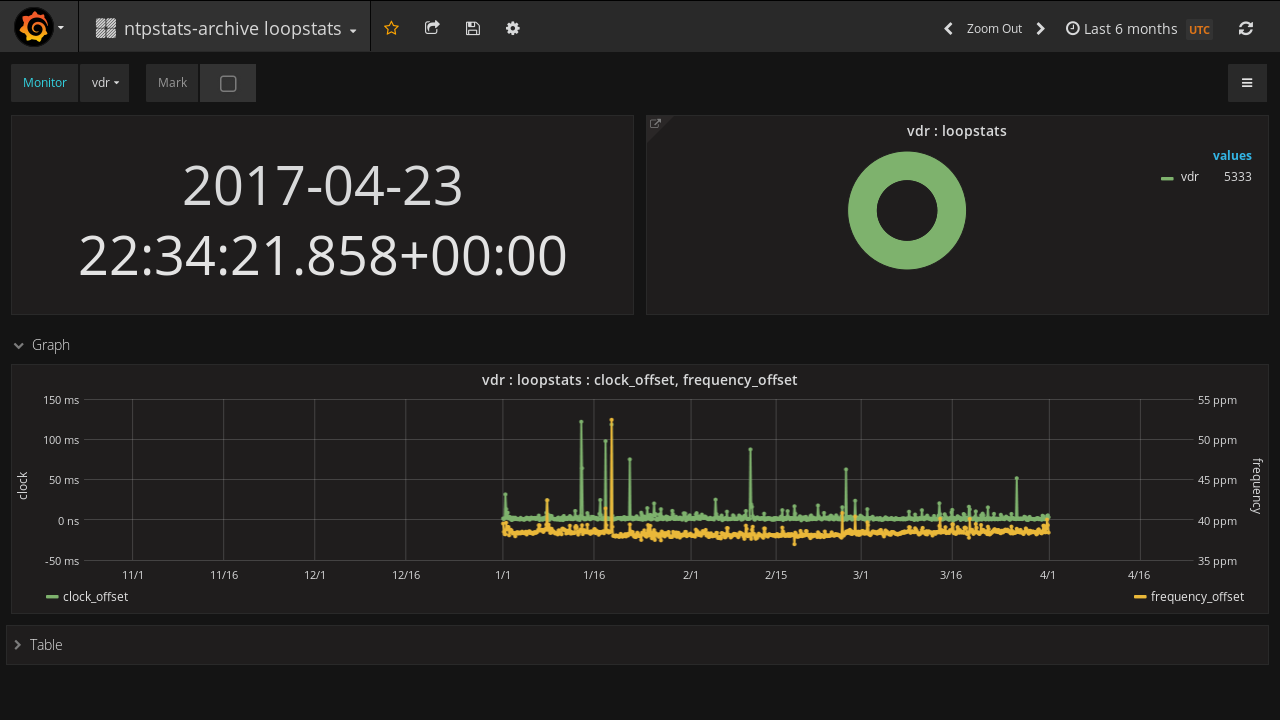
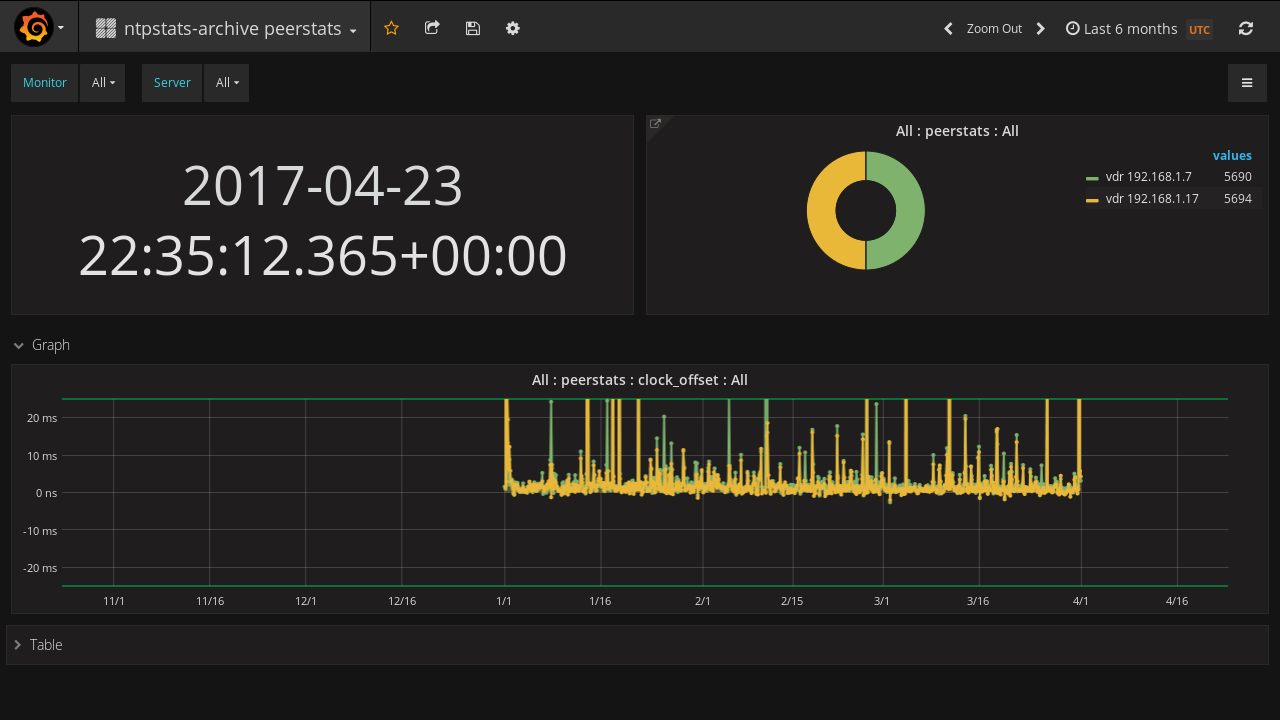
Sie importieren drei Dashboards.


